AccuMark® Professional Edition
What’s New for AccuMark 12.0.0
Enhancements since 11.0
Version 12 Licensing
If you have a previous V10 key (or dongle) you can use that key for AccuMark Family V12 – you will just need to get your license updated for this V12.0 software version. Contact your local Service and Support team and they can easily get you updated per your entitlement and on your way to using all the new features and updates in the new software!
Previous What’s New Documents
What’s New documents for previous versions are now included in the documentation installation. You can access these through the AccuMark V12 icon on your desktop and from within AccuMark Explore’s View tab in the ribbon.
This will allow those of you who are updating from earlier versions to see the enhancements and new features that have been implemented since your last software update.

Millimeters everywhere!
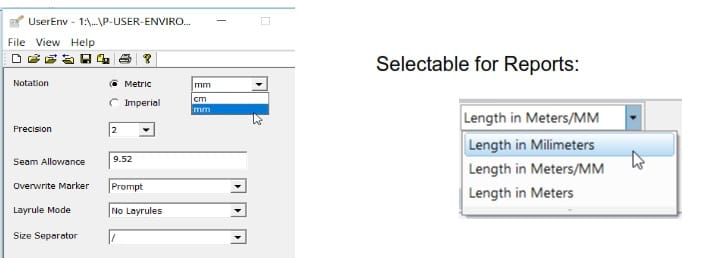
We have added greater measurement abilities throughout all of AccuMark starting with the User Environment Parameter Table. You’ll see a new drop-down choice while in Metric called “mm” for millimeters.
This unit displays in title of forms and wherever values are shown in the forms, processes, and reports.
New Model Status Field
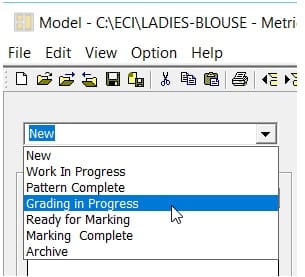
Models have been updated to contain a Status Field. The status is selectable in the model editor.
Use the status to set the stage that the model is currently in from the options that are available through the dropdown.
Pattern and marker makers can easily know the current stage the model and its pieces are in.
The new Status is only valid in Professional Edition, so it is grayed out for the AccuMark Advanced Edition.
Status is only valid for data in version 9 storage areas and is grayed out for in version 8 storage areas. The model can be stored in either userroot or SQL version 9 storage areas.
The status will be printed when using the Model Grid print options and shown in the print preview.
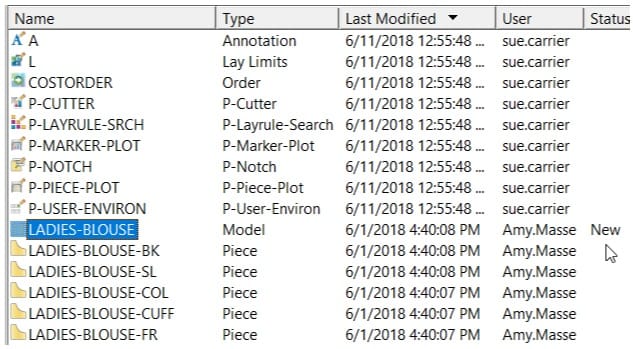
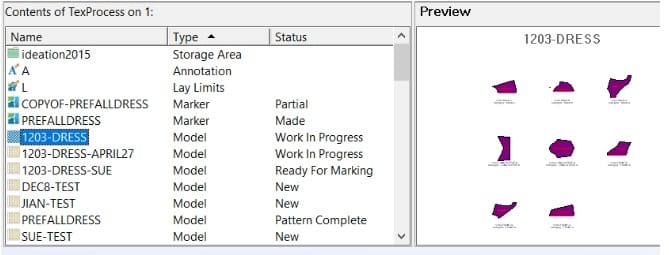
The status will be shown in the AccuMark Explorer’s Status column for models. This is similar to the marker status that is also shown in this column.
The Status will be removed when Exporting V9 Models / Pieces to V8 and the user will be informed thusly in the results window as well as written into the Export Log.
AccuMark Find has been enhanced to also show the model status in its results window. We are working on the ability to use Find to locate models with a specific status in an upcoming release.
This will be similar in effect to the way you can search for markers based on a specific status.
Find: Model Status
You can use Find to search for model(s) with a specific status. On the Advanced tab, select the model data type, then click on the … lookup button in the Filter and you will be presented with a dialog that contains the list of model statuses to search for:
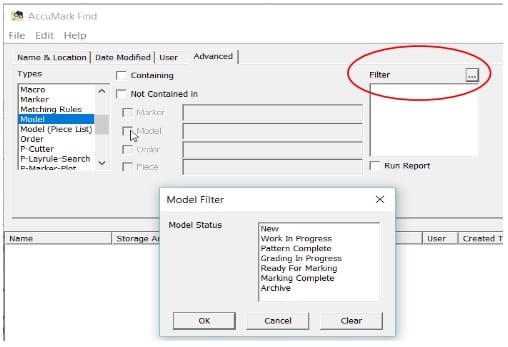
The user can then select any / all of the models listed in the results window and right-click to perform further actions. You can optionally check-on the “Run Report” function and it will automatically execute the model report.
Model: Piece Comments
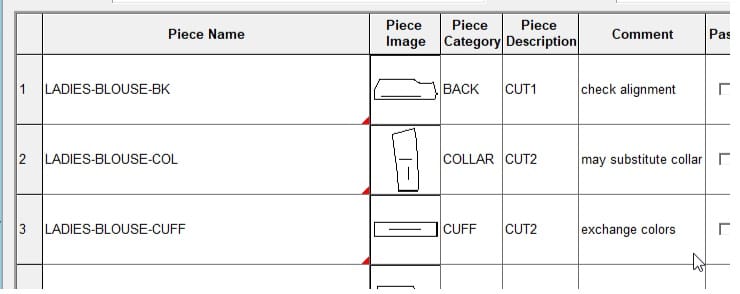
The model editor has been updated to have the new piece comment in its own column. Previously it was only visible as a tooltip when you hovered over the piece name. The small-red- triangle will still display on the lower right corner to indicate a comment is present. This is a nice feature if the user decides to hide the comment column.
Model Colors
Models now have their own selectable colors. Use the colors to easily identify individual colors per model or for a set of models. Then, when in Easy Marking you can easily identify the pieces that belong to a particular model.
You are presented with a drop down that will display a grid of selectable colors:
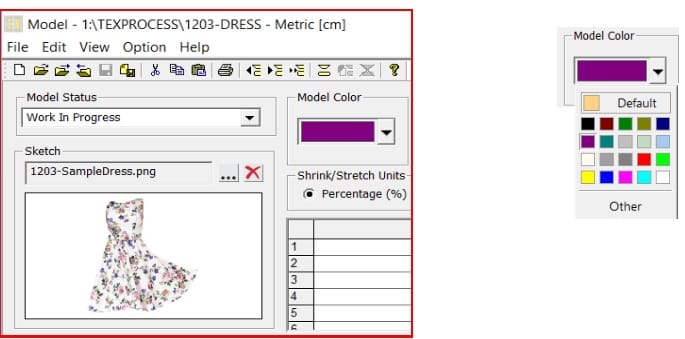
In AccuMark Explorer, when “Fill Area” is selected in the Preferences and there’s a color defined for the Model, then it will use that color for the pieces being displayed.
If no color is assigned in the model, then it will work as it does in V11.0 where it will show the color as defined in PDS.
We also provided a default color reset button which will use the black color
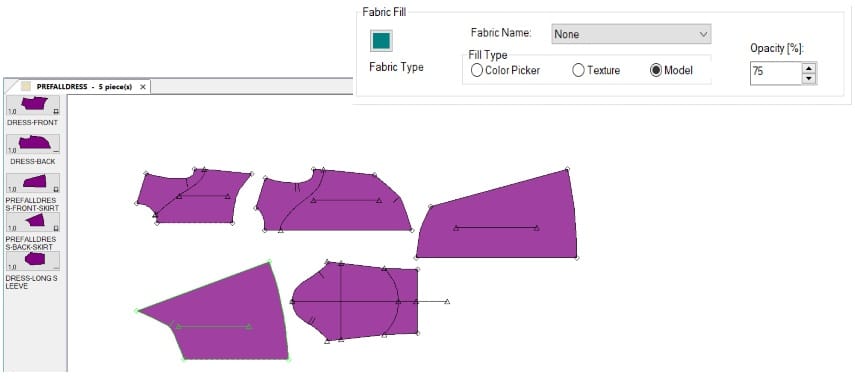
In PDS, you can also choose to use the model color. Select this option in Edit, Customize, Preferences, then on the Color tab, select the Model button:
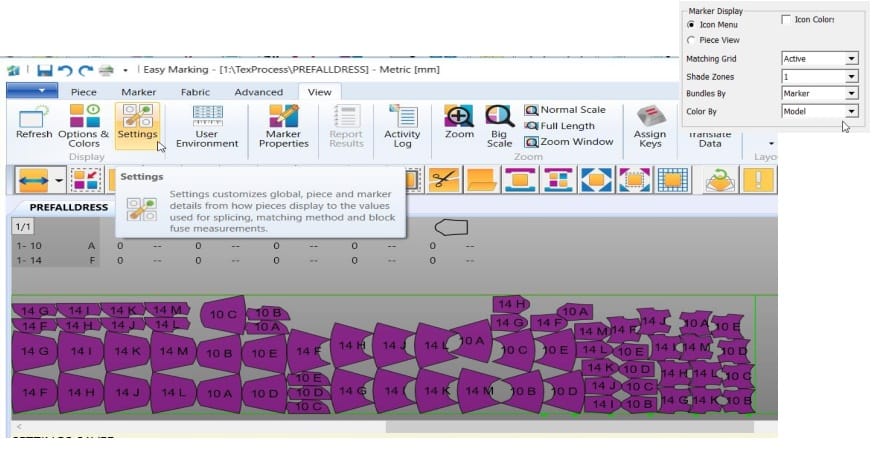
In Easy Marking, optionally choose to use the model color here. Go to View, Settings, and in the Marker Display section, select the Color By drop down and then the Model option:
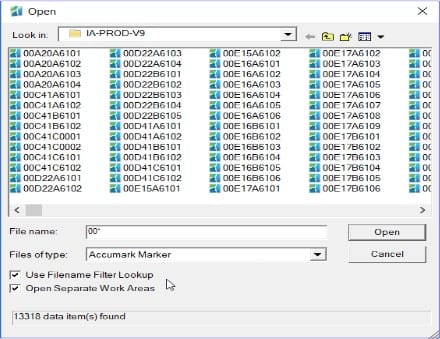
Open Dialogs: Filename Filter Lookup
Per your requests, we have added the file name filter lookup textbox back into the file dialogs in AccuMark.
The filter provides you with the ability to enter in data name search criteria including wildcards, which will remain sticky.
The filter delivers a faster way to retrieve the desired list of data items that you would like to work on, saving you time when searching though storage areas with many data items.
Yunique PLM V8 integration AccuMark V12 supports connections to Yunique PLM V7 and V8. YPLM V7 still uses the CAD Relational Database to retrieve marker, model and their piece statistics from AccuMark. YPLM V8 now uses APIs to retrieve that statistical information.
In AccuMark Explorer’s File – Options, in the Configuration section you will specify which version of Yunique PLM you will be connecting to.

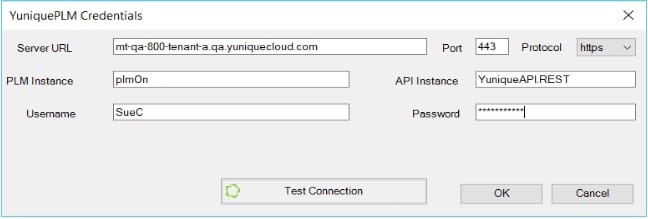
Use the PLM Login Credentials to setup your connection to Yunique PLM to retrieve PLM Materials and Images.
When connecting to YPLM V7, you will still fill out the information in the SQL Support dialog as you have done in the past, identifying the PLM Server connection and database to use, as well as your login credentials, for example:

When connecting to YPLM V8, you only need to configure the PLM Login Credentials to integrate for the retrieval of YPLM Materials and Images, as well as sharing AccuMark marker, model and their piece statistical information to YPLM.
Easy Order Improvements
Automation using Easy Order has been further enhanced, building on features first introduced in AccuMark version 11.0 for automation improvements.
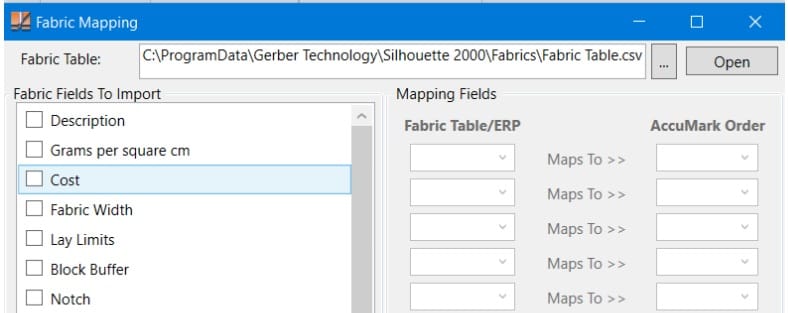
Fabric Mapping Fields Column headers were added to the Fabric Mapping form to allow users to identify fields from an ERP system that will be transferred to an AccuMark marker order.
The headers illustrate the information from the Fabric Table that will be entered into the AccuMark order and which AccuMark order field to use for these values.
Introduction of QR Codes
A QR code, an abbreviation for “quick response” code is a type of barcode that contains a matrix of dots. Once scanned, software on the device converts the dots within the code into numbers or a string of characters.

QR codes have two significant benefits over traditional barcodes.
Can contain significantly more data than a one-dimensional barcode.
Can be scanned from a screen display
A QR code can now be created for plotting, and plotted on the marker border or inside individual pieces.
Note: The plotter hardware must be able to support the plotting of this new format, such as the MP series with the latest version of firmware.
Older plotters, especially pen plotters, are unable to plot this new feature.
Defining a QR code in the Annotation Editor
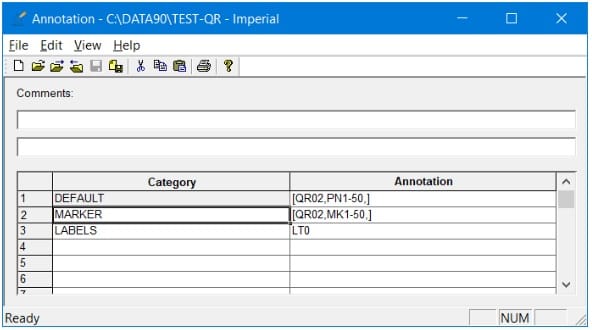
The QR code is defined in the Annotation Editor in much the same way as a Barcode was defined in previous versions of software. The code to specify a QR code is “QR” with the type defined by a number.
The format for a QR code identifier is: [QRYY,annotation,annotation,]
where the YY is 02, 06, or 10 for version 2, 6, or 10 followed by the annotation to be transformed to the code, each separated by a comma.
For example, in the Annotation Editor:
DEFAULT = PN1-20,SZ1-6,/,[QR10,PN1-50,] would plot the piece name on each piece as a QR code type 10.
MARKER = MSQ,/,AP,/,WI,L,U,PS,/,[QR10,MSQ,] would plot the Model, Size, and Quantity in the Marker Border as a QR code type 10.
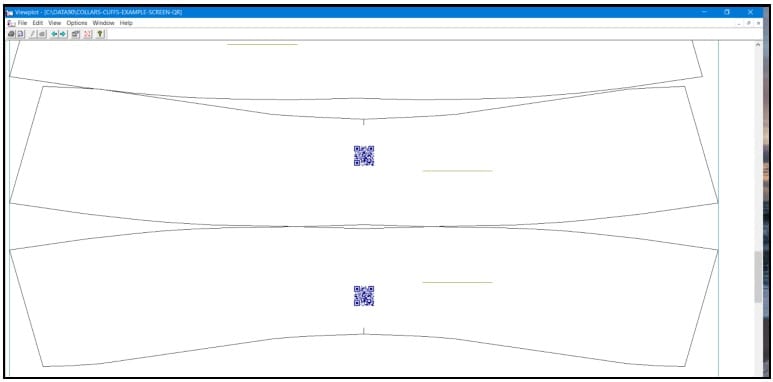
Another example would be to plot the piece name on each piece and the marker name along the border, as shown below in this example, with a QR code defined as version 02.
Easy Marking Improvements
AccuMark Easy Marking is continuing to improve by providing more productivity tools.
Centering Multiple Pieces
In prior software versions, the toolbox function “Center” allowed users to Center single pieces or groups of pieces as one unit. This feature is found in the Easy Marking toolbox.
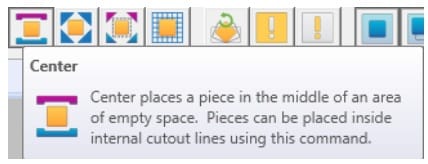
A new function “Center Multiple” has been added to the Toolbox, which works in a different way for a group of pieces. Now, if you are in the Center Multiple mode, hold down right mouse button to create a selecting area.

A box will be drawn around the pieces, and when you release the button, all pieces in that selection area will be centered. This is useful especially when creating a marker to be sent to an automatic cutter to take full advantage of the open area.

AccuMark Explorer
Export Zip Enhancements
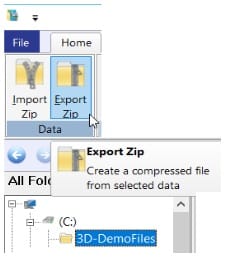
Buttons for Import Zip and Export Zip were added into the AccuMark Explorer’s Home tab in V11.0.0.
We have continued to implement additional export capabilities around storage areas and subfolders and the naming of the corresponding zip file names.
Now you have multiple ways to export storage area(s) and subfolders, depending on the location(s) you have highlighted.
When exporting a SQL storage area that contains subfolders, you can choose whether or not to include its subfolders.
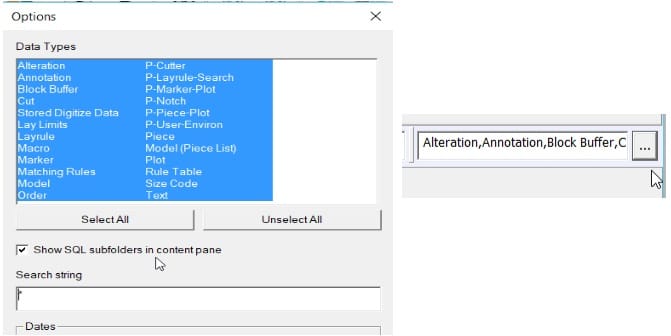
To include SQL storage area subfolders, be sure to have the “Show SQL subfolders in content pane” checked-on. This option appears when using the 3-dot lookup button for the data type filter in AccuMark Explorer.
If this option is not checked-on, then the subfolders will not be exported.
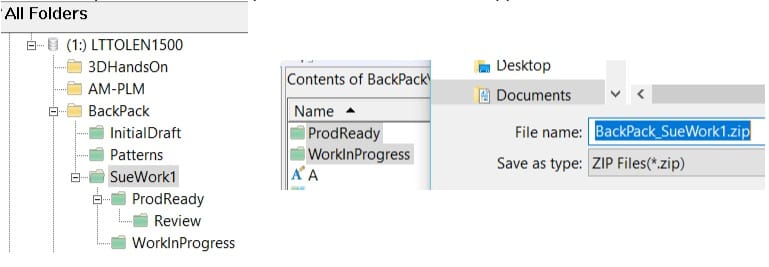
If you choose one storage area for export, the default file name is the storage area name. When exporting a single subfolder, the zip file name will be the storage area and subfolder name:

When you choose multiple storage areas to export, the default name is derived from the drive or device name (i.e. Device_1.zip):

If you choose multiple subfolders to export, the default name is the upper level folder name:
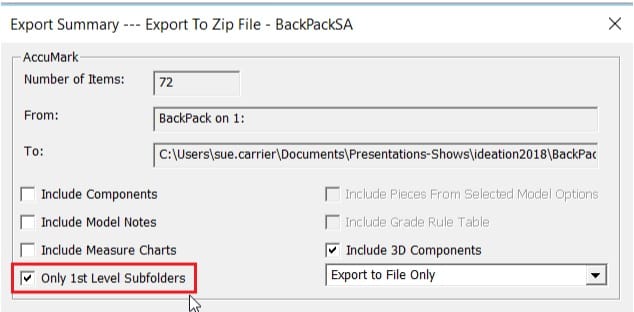
Some users wished to only export the storage area and the very first subfolder, and not have all the subsequent subfolders included in the zip file. For this the option “Only 1st Level Subfolders” checkbox selection was added:
When importing the exported SQL storage areas with subfolders into userroot storage areas, all data would be imported including data in subfolder into the single userroot storage area.
When you’re importing the exported storage areas and subfolders into SQL storage area, it maintains the subfolder structures.
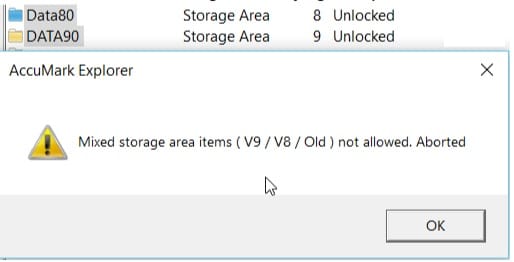
Checks have been added to validate that you are only exporting storage areas and data that have the same version (mixed versions of data are not allowed in the same zip file). Users are presented with informational dialogs when trying to export mixed versions of data.
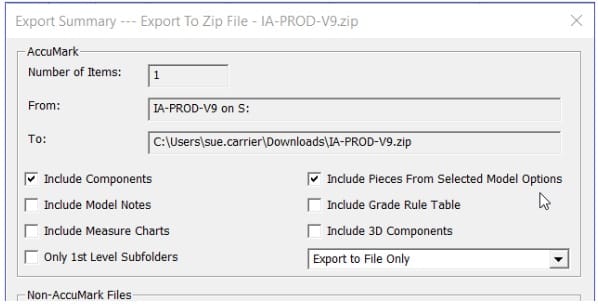
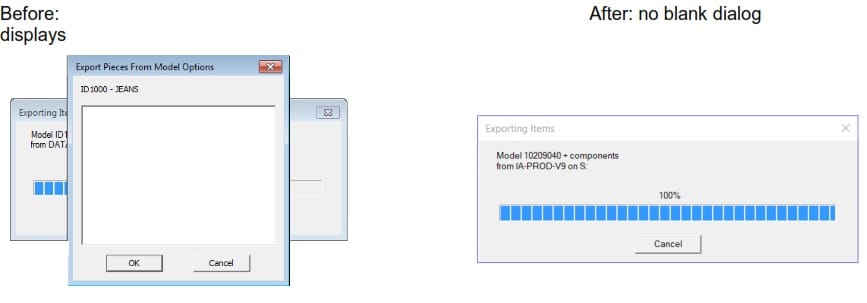
In Export Zip, you can optionally select to include Model Options. Previously when exporting models that did not have any options, a blank dialog would display.
We have updated the export zip functionality to only display the model options dialog when the model actually has options, causing less confusion and saving you time through less confirmation clicks.
User Settings enhancements
In addition to being able to export and import PDS and Easy Marking user settings, you now have the ability to export and import AccuMark Explorer’s user settings. Your customizations!
Configure AccuMark Explorer to the way you like it, and export to save those settings, then import to restore saved settings.
This can be especially handy for bringing your preferences with you when you work on multiple computers, have a backup of your settings should your computer crash or you get a new one, or to setup a new user to have similar settings. Be sure to save a backup copy.

Set a default fabric table
A new option that easily allows the user to set which fabric table they would like to use when creating new models has been added into User Settings as well. Pick a fabric table to use as your default one when you create new models in any of your storage areas. You can still choose an alternate fabric table when needed.

Check V9 Storage Areas – more information is presented
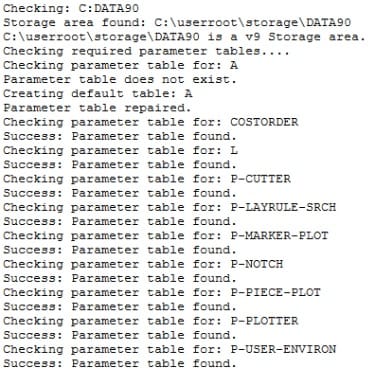
Checkfiles will list more information when performing checks on version 9 storage areas. Users have asked for more output so they can see what is being analyzed. Use the “Logfile” option in the check storage area application and the information that is verified will be listed.
For example:
Preview Pane – Label and Edge Finish for Images!
When using the AccuMark Explorer’s Preview Pane, and the option “Display Images” on for Models or Pieces, you will now see label and edge finishes on the pieces.

Setup in PDS and then check it out in AccuMark Explorer.
NEW Report UI and Configuration
We have implemented the ability to create customized reports along with a new and exciting user interface. You still have access to the original report methods including the “Internal Application” (AccuMark format) and “Registered Format” (Excel format). Take a look, try it out, and let us know what you think!
In AccuMark Explorer, Reports tab there is a new option called “New Reports”. When this is checked-on you will be able to use the new reports and customize what you would like to see. The customization allows you to pick information from different existing reports for that data type.
When you right-click on a data item that has reporting capabilities, you will be presented with these options:

•DEFAULT – show data in default layout, can also Edit configuration
•Edit Configurations – brings you directly to customization
In the report itself, you can also select the Edit button to configure:
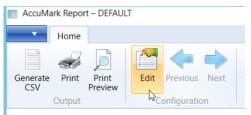
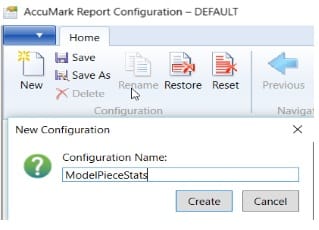
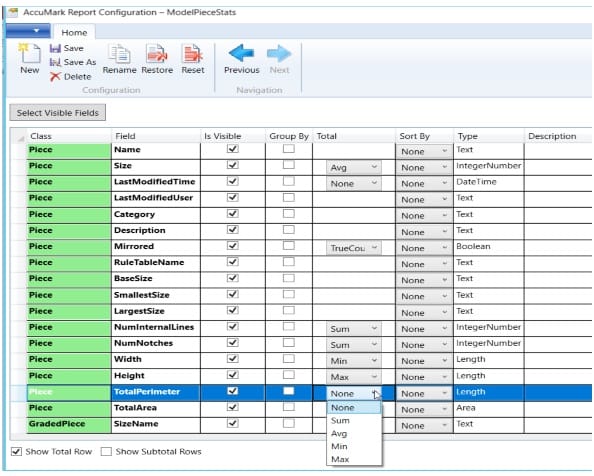
In the Configuration is where you can Create / Update / Save / Delete / Rename report layouts. You can Name the Configuration layout – create & use as many as you like! And then you can Pick which configuration to use.
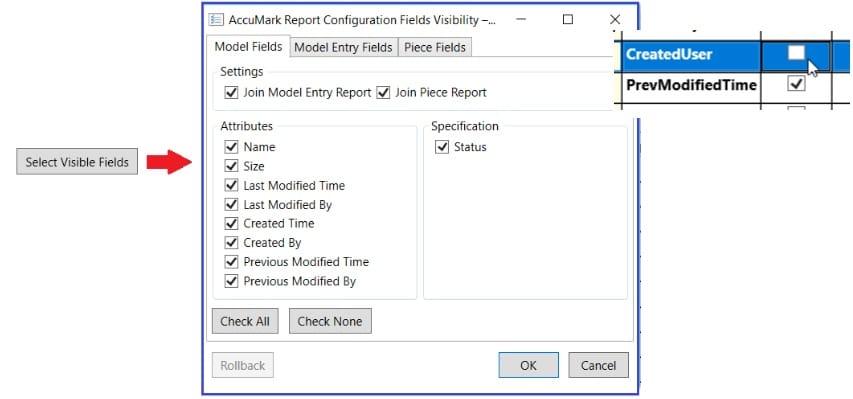
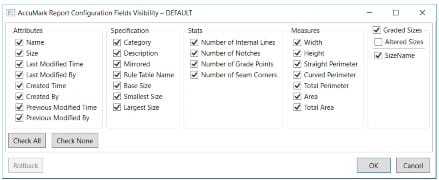
In the configuration, you will Select Visible Fields – Choose fields from the reports that you want to see in your customized report.
Or you can check on/off in form.
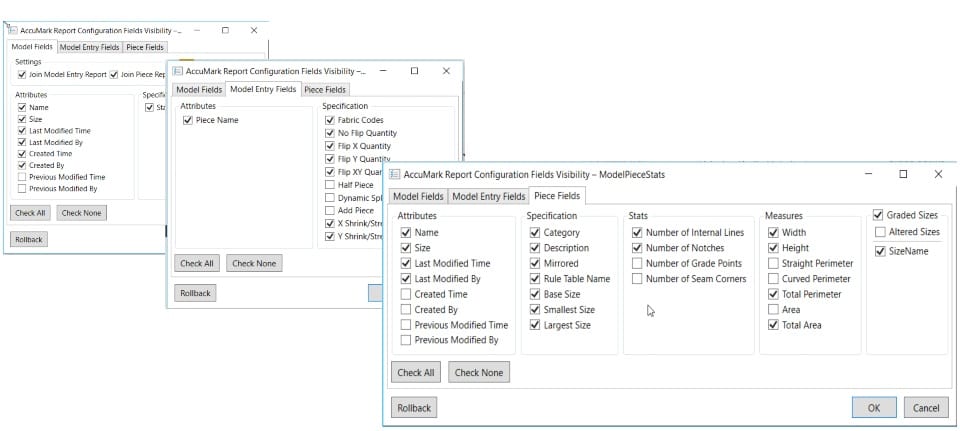
Easily click-on or click-off the fields to display:
There are options for Automatic Total calculations. Choose ‘what’ to total via drop-down. Save your layout(s) to be used at any time.
For example, the next time you right-click on the data item you created the report layout – it will display in a list of choices:
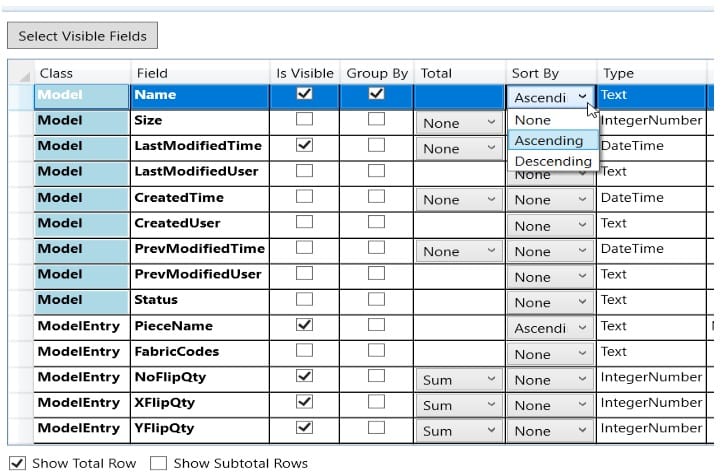
You can set Groups (checkbox), and Sort By item(s).
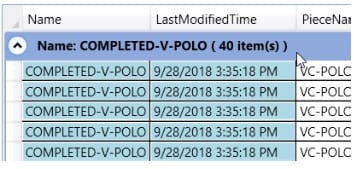
Group show with “header”:
In the configuration you can drag to sort. For example: Drag the Piece Name up and show as the second row.

Class column = what report info came from:
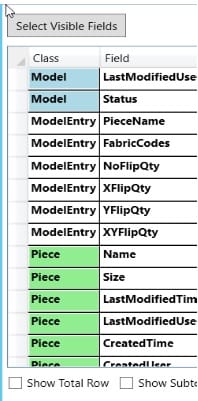
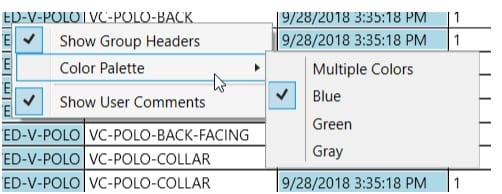
There are some selectable colors (right-click):

You can Expand / Collapse groups:

The Configuration is saved per data type
•model, marker, piece – each has a folder with a default.cfg
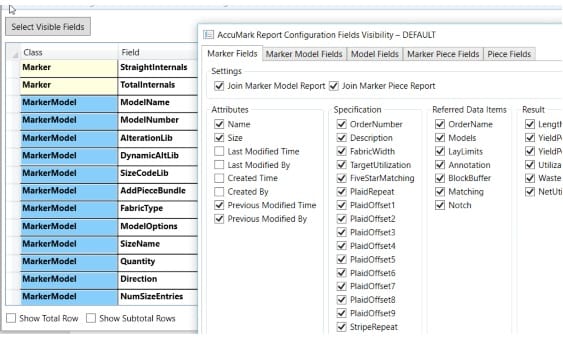
You will always have one default configuration “DEFAULT” that cannot be deleted – it must have one to work with.
Cut Generation Enhancements
Improvements have been made to printing in Cut Generation to further improve communication with the cutting room.
Barcodes for Cut File Name
The cut file name can now be printed as a barcode, a feature that can help ensure the correct file is selected at the cutter, avoiding having to manually type or search for the cut file name in a look up at the cutter.
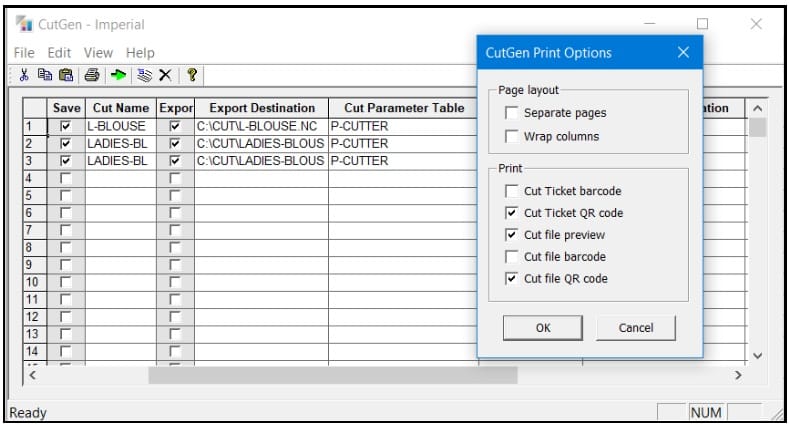
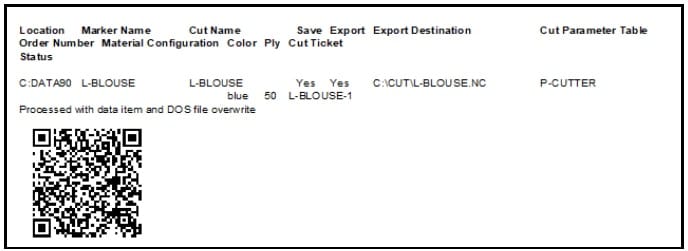
QR Codes for Cut File and Cut Ticket
In addition to support for QR codes which was added to the AccuMark in marker annotation, QR codes can be created in the Cut Generation print function.
A QR code can be created for a Cut Ticket, a Cut File name, or both.
Version 8 Storage Areas – Phase Out
This is a Notification Only – there is no set date or release yet.
We are working towards a phase out of the AccuMark’s version 8 storage areas, similar in effect like our current version 7 storage areas. The phase out will be done in stages, and we will give you plenty of notification and time to prepare. Think about what it would take for you to move forward, or if there are any restrictions or challenges that are holding you back.
Phase out stages:
•V8 storage areas will become read-only
•Remove ability to create v8 storage areas
Considerations:
•Vendors / others you may share data with – prepare an upgrade plan
•Export V9 Models / Pieces to V8 strips off new features
Existing V7 and V8 storage areas can easily be upgraded to a V9 format beginning in AccuMark version 10.4.0.
Go to AccuMark Explorer’s File – Options, Storage Area section and learn about the Upgrade Storage Areas functionality.
Why the Phase Out?
V8 storage areas have limitations:
•# of data items per storage area, number of characters in names, sizes, comments, rules, etc.
•Cannot handle new or extended features, old control-file and data-file format
•Performance hurdles
V9 storage areas have more capabilities:
•New features: longer names: data item/storage area/option; extended comments, piece bookmarks, images, double-grading, 3D capabilities
•Performance improvements, new efficient data format, no file-locking issues, no physical AM size limits
Get Started: Use V9 Storage Areas for all new data being created to fully utilize the powerful new features being developed and benefit from all the new capabilities that come with version 9 storage areas.
Start simple – create a version 9 storage area and copy your version 8 data into it – try it out, take advantage of the new abilities you’ve been wanting to check out!
Link Free Download Gerber Accumark V12 Full Setup
https://www.mediafire.com/file/5y1lh3kjxatxkn7/GAccu-Muoi-Hai.part1.rar/file
https://www.mediafire.com/file/vcdyc0j55hkzggk/GAccu-Muoi-Hai.part2.rar/file
https://www.mediafire.com/file/qf61wdysrvwjiaq/GAccu-Muoi-Hai.part3.rar/file
https://www.mediafire.com/file/m4tqy8p1ihxsigj/GAccu-Muoi-Hai.part4.rar/file
https://www.mediafire.com/file/2p6hzjj58rm3w6v/GAccu-Muoi-Hai.part5.rar/file
https://www.mediafire.com/file/wjpbdjvh2lloav7/GAccu-Muoi-Hai.part6.rar/file
https://www.mediafire.com/file/ugvijec6l0suh75/GAccu-Muoi-Hai.part7.rar/file
Total 7 part, download all.
Pass extract: haduytin2you




please give the best price
geber 12,14,16 crack
Dear Sir,
please share me Gerber Accumark V12.2 or V13 crack link
HOS171172M@gmail.com
dear sir, could you be so kind to share me the accumark v12 please
bedo.bedo306@gmail.com is my mail
thanks by your support,
god bless you
i no free.
price gerber 12.14,16 crack
drhossam_eldien@yahoo.com
dear sir, could you be so kind to share me the accumark v12 or v13 please
rasitnarcicek2@gmail.com is my mail
Hi!
Can I get a v12 or 13 full crack version?
junhokim30@gmail.com
Thank you
Dear Sir,
please share me Gerber Accumark V12.2 or V13 crack link
evosas@yandex.com
Dear Sir,
please share me Gerber Accumark V12.2 or V13 crack link
eng.hamada.s6@gmail.com
Dear Sir,
please share me Gerber Accumark V12.2 or V13 crack link
abumusa4000@gmail.com
dear sir, could you be so kind to share me the accumark v12 please
galosamuel64@gmail.com is my mail
thanks by your support,
god bless you
now, i no free, if you need it, can contact me: haduytintyt235@gmail.com